
一种出色的蓝色天然复活节彩蛋染色技术 – 两种方式!
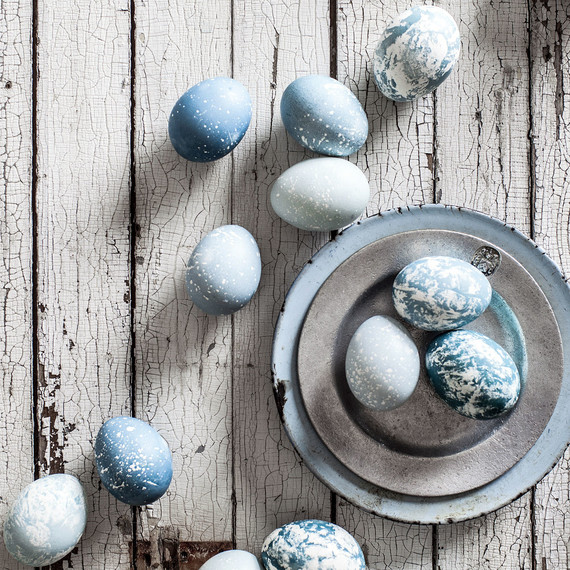
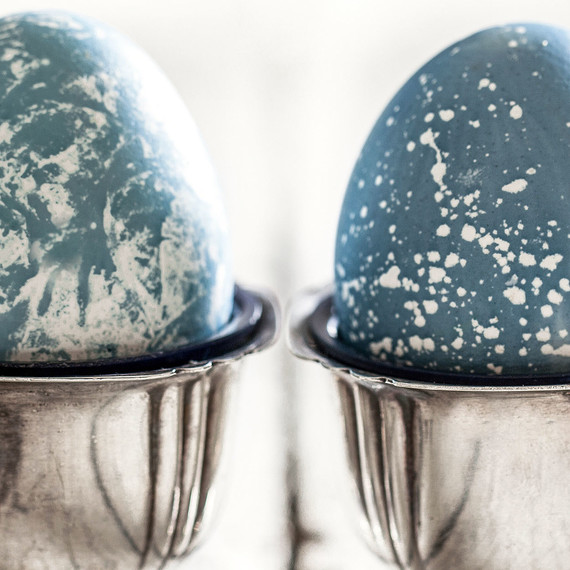
有时我本能地将眼镜,碗,盘子和亚麻布结合在一起,没有特别的目的,然后请求Jim在他们周围创造食谱。完美配对的罗宾的蛋蓝珐琅和褪色的银色坐在我的准备桌上好几个月,只是希望我整个冬天都会使用它们。盯着这堆菜肴,不想把可爱的东西拿走,灵感袭击了我。珐琅有斑点和大理石纹的图案非常适合染色这个春天的复活节彩蛋!
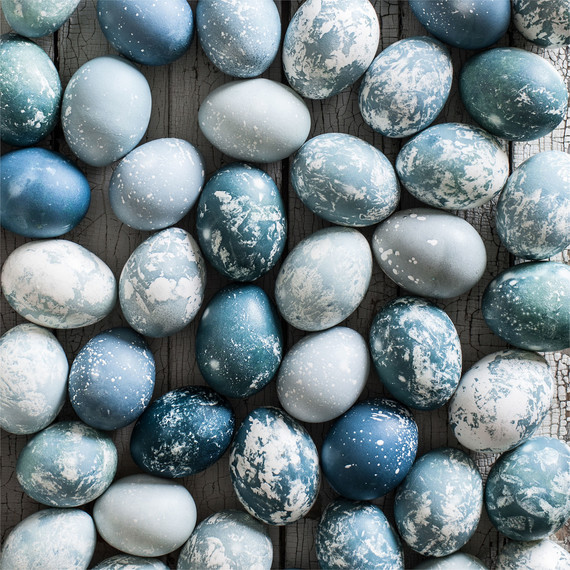
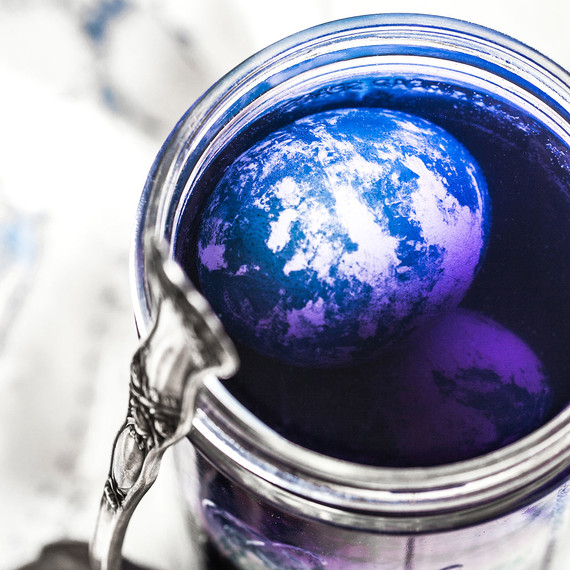
拿出真正的蓝色外观进行了一些研究。吉姆和我知道我们想要使用天然染料,经过多次尝试,我们落在红甘蓝上,颜色正确。如果您有兴趣了解更多,我们在这里为天然染料创建了一个Pinterest板.
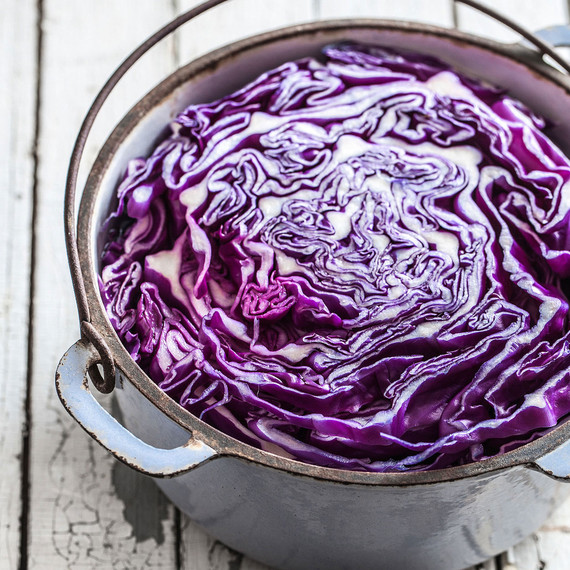
创造着色剂: 煮沸切碎的红甘蓝,加入两夸脱水和半杯白醋两小时。倒入罐子里冷藏。这也是煮鸡蛋的好时机.
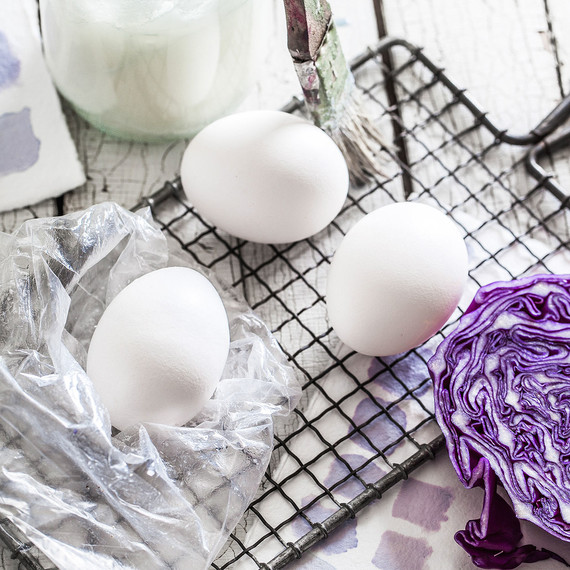
作为一名画家,我自然而然地想到了用于水彩画的遮蔽技术。它可以起到抵抗力,保留鸡蛋的白色部分。坚持使用天然材料制作椰子油这些鸡蛋也非常有效.
创造大理石外观: 将两个塑料三明治袋放在手上,如手套,用椰子油涂在袋子上,用手捏住塑料,然后轻轻触摸鸡蛋,一只手从另一只手转到另一只手.
创建斑点外观: 在微波炉中加入少量椰子油。蘸上刷子,用手指朝向鸡蛋的方向轻拍.
染鸡蛋: 用金属开槽勺将鸡蛋转移到冷着色剂罐中。根据所需的颜色,让鸡蛋静置20分钟到几个小时。用勺子将鸡蛋从罐子中取出,然后冷藏。一旦鸡蛋干了,用纸巾擦拭油,以保持鸡蛋的颜色和光泽.

对我来说,没有什么比鲜花更能说明春天了。在创造我们的鸡蛋的同时,我去了市场,拿起一些蓝色的绣球花,融入我们的单色场所。我喜欢将金属和玻璃混合搭配单色调。在这种情况下,我没有很多蓝色珐琅器,所以我添加了银盘,玻璃盘子和蓝色盐和胡椒瓶,以完善外观。我喜欢异想天开的性质,但不喜欢巢的颜色,所以我白了洗它们以配合我的设置,并拔出五颜六色的缎花.
如果您感觉非常雄心勃勃,可以尝试使用白色亚麻布或水彩纸上的天然染色技术来制作餐垫。我剩下很多染料,所以接下来我可以尝试一下!
学习如何为复活节彩蛋制作其他天然染料
27.04.2023 @ 08:51
As an AI language model, I do not have a specific language as my mother tongue. However, I can provide a translation of the text into English:
Photography: Jenna Carlin Creative. Sometimes I instinctively combine glasses, bowls, plates, and linen without any particular purpose, and then ask Jim to create recipes around them. Perfectly matched Robins egg blue enamel and faded silver sat on my prep table for months, just hoping I would use them all winter. Staring at this pile of dishes, not wanting to take away the lovely things, inspiration struck me. The enamel with spots and marbled patterns is perfect for dyeing Easter eggs this spring!
Photography: Jenna Carlin Creative. We did some research on creating a true blue look. Jim and I knew we wanted to use natural dyes, and after several attempts, we settled on red cabbage, which gave us the right color. If youre interested in learning more, weve created a Pinterest board here for natural dyeing.
Photography: Jenna Carlin Creative. Creating the dye: Boil chopped red cabbage, add two quarts of water and half a cup of white vinegar for two hours. Pour into a jar and refrigerate. This is also a good time to boil eggs.
Photography: Jenna Carlin Creative. As a painter, I naturally thought of using masking techniques for watercolor painting. It can act as a resistance, preserving the white part of the egg. Using natural materials to make coconut oil is also very effective for these eggs.
Photography: Jenna Carlin Creative. Creating a marbled look: Place two plastic sandwich bags on your hand like gloves, coat the bags with coconut oil, pinch the plastic with your hand, and then gently touch the egg, transferring it from one hand to the other.
Creating a spotted look: Add a small amount of coconut oil to the microwave. Dip a brush in it and lightly tap your finger in the direction of the egg.
Photography: Jenna Carlin Creative. Dyeing the eggs: Use a metal slotted spoon to transfer the eggs to the cold dye jar. Let the eggs sit for 20 minutes to a few hours, depending on the desired color. Use a spoon to remove the eggs from the jar, then refrigerate. Once the eggs are dry, wipe them with a paper towel to maintain their color and shine.
Photography: Jenna Carlin Creative. For me, nothing says spring like flowers. While creating