
刺绣机101:如何使用它们和制作什么
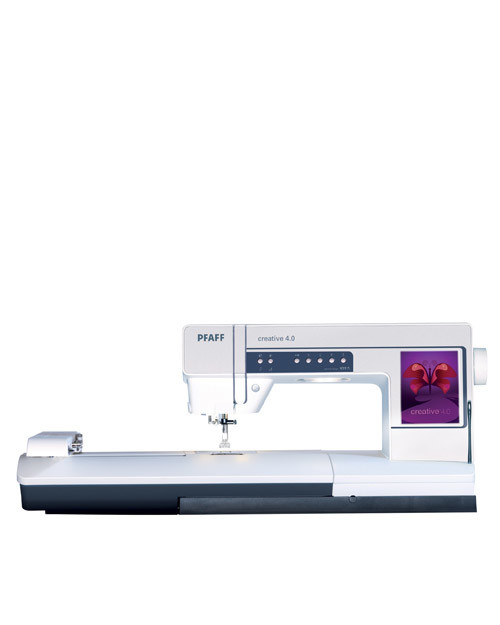
我最近刚进入机绣。我的介绍开始时,我收到了一台带有刺绣附件的兄弟缝纫机,一旦我完成了我的第一个刺绣项目,我就坠入爱河!我会承认起初我有点紧张,因为我之前从未在缝纫机上使用过这种功能,但是一旦我阅读了手册并熟悉了框架和设置,就很容易.
调整和固定零件
如果您使用的是缝纫和绣花机组合,则在切换功能时需要进行一些调整。在开始之前,请确保机器已关闭并从电路中拔出。首先,将压脚切换到织补或手绘刺绣脚。您也可以将这只脚连接起来,放下喂食犬,然后用双手自由地绣花。要使用电脑刺绣,您需要一个刺绣框架,它们有各种尺寸。绣花设计越大,您需要的框架越大。您可能还需要关闭手臂。要执行此操作,只需拉出并单击连接到框架的绣花臂即可.
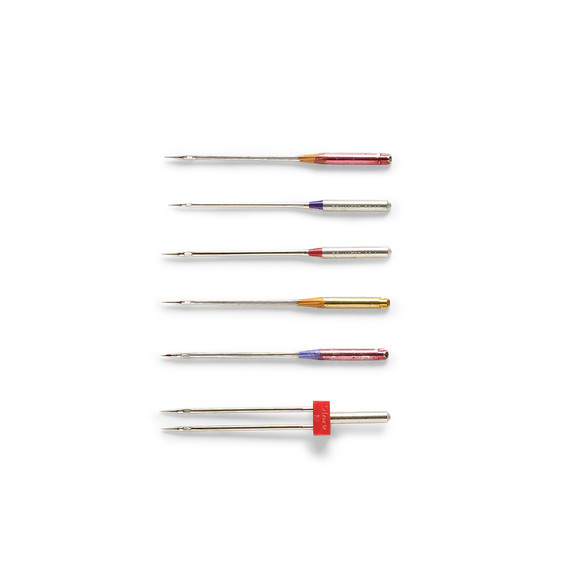
插入刺绣针
对于任何刺绣项目,必须使用刺绣专用机针。这种针有助于防止绣花时断线。对于线程,你可以使用常规线,但刺绣线有一个可爱的光泽,使你的刺绣设计真的流行,看起来很专业。对于绣花设计,您可以在机器上使用预编程设计,或者如果您的机器有USB端口,您可以在线下载绣花设计并将其导入您的机器.
[专家咨询:关于缝纫机针的所有问题 – 已回答!]
设置面料和绣花线
在将绣花框架插入机器之前,必须先将布料放入框架中。如果您的面料很薄,您可能还需要使用稳定剂。将您的布料放在底部框架上 – 它可以是一块织物,将变成口袋或贴片,已经镂空的图案片或成品服装。将顶部框架放在布料上,然后按下以单击或锁定框架。然后,转动转盘或旋钮以拧紧框架并确保其牢固。您可能需要使用螺丝刀才能保持良好和紧凑。另外,拉起布料的两侧以确保其在框架中没有松动.
翻转闩锁,将框架滑入绣花臂,然后单击向下以固定并锁定到位。仔细检查框架下是否没有其他布料,并且您的梭芯已满载。将梭芯线与主线或绣花线颜色或布料相匹配。选择您的绣花设计,无论是预装还是USB驱动器。大多数绣花机将允许您尝试调整设计的大小和框架内的定位。您还可以根据所用的线程选择颜色,以预览设计的外观.
绣你的面料
设置好所有内容后,查看排队中首先选择哪种线色并将其穿过针并按开始键。屏幕上将有一个绣花序列,一旦每个线色完成,机器将停止。只需抬起压脚,更改线头颜色,再次点击直到所有颜色都完成!绣花完成后,抬起闩锁并滑出绣花框架。使用一把小疤痕剪刀或刺绣剪刀夹住所有松散的线。尽可能将它们夹在刺绣上。最后给你的刺绣一个压力机,框架可以显着折皱刺绣周围的织物.
[尝试:15个刺绣项目今天尝试]
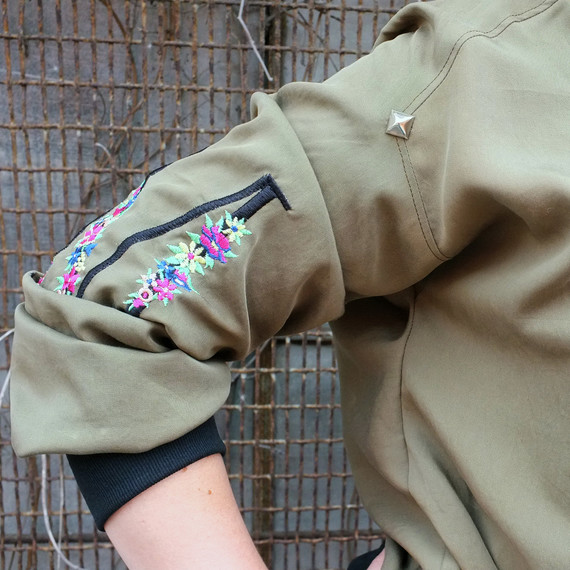
这是一个用于飞行员夹克的机器刺绣的例子。为此,我将袖子图案从布料中剪下,然后插入绣花框架。在缝制之前最简单的方法是使用扁平套筒图案。对于这件夹克,我实际上是用黑色斜纹绣,然后剪下刺绣,然后将其缝合到夹克上。当你有像天鹅绒这样的棘手织物时,这种方法效果很好。大多数具有高绒毛的织物难以顺利地绣花.
通过这些易于遵循的说明,您将立即使用您的绣花机。观看玛莎如何使用她的机器:
27.04.2023 @ 01:48
As an AI language model, I do not have a native language, but I can provide a translation of the text into English:
“I recently started machine embroidery. When I first started, I received a Brother sewing machine with embroidery attachments, and once I completed my first embroidery project, I fell in love with it! I will admit that at first I was a bit nervous because I had never used this function on a sewing machine before, but once I read the manual and became familiar with the frame and settings, it was easy to adjust and fix the parts. If you are using a sewing and embroidery machine combo, you will need to make some adjustments when switching functions. Before starting, make sure the machine is turned off and unplugged from the circuit. First, switch the presser foot to the darning or free-motion embroidery foot. You can also connect this foot, lower the feed dogs, and then embroider freely with both hands. To use computer embroidery, you need an embroidery frame, which comes in various sizes. The larger the embroidery design, the larger the frame you will need. You may also need to close the arm. To do this, simply pull out and click the embroidery arm connected to the frame. Insert the embroidery needle. For any embroidery project, you must use a special embroidery machine needle. This needle helps prevent thread breakage during embroidery. For thread, you can use regular thread, but embroidery thread has a lovely sheen that makes your embroidery design really pop and look professional. For embroidery designs, you can use pre-programmed designs on the machine, or if your machine has a USB port, you can download embroidery designs online and import them into your machine. Set up the fabric and embroidery thread. Before inserting the embroidery frame into the machine, you must first place the fabric in the frame. If your fabric is thin, you may also need to use stabilizer. Place your fabric on the bottom frame – it can be a piece of fabric that will become a pocket or patch, a pattern piece that has already been cut out, or a finished garment. Place the top frame on top of the fabric, then press down to click or lock the frame. Then, turn the dial or knob to tighten the frame and ensure it is secure. You may need to use a screwdriver to keep it tight and compact. Also, pull up the sides of the fabric to ensure it is not loose in the frame. Flip the latch and slide the frame into the